Website Administration
Basic and advanced knowledge within the BIOMOTO website structure
Website Structure
How are the websites of BIOMOTO structured?
Structure of franchise websites
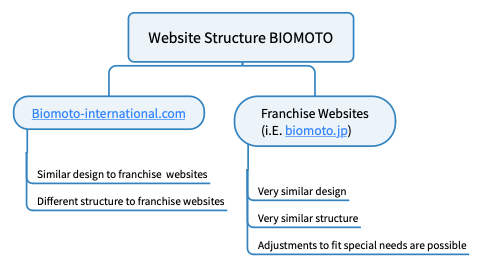
BIOMOTO tries to have the best user experience and ensure a huge recognition value on their websites. To ensure this we build up all websites in a similar way. This also saves time and money.
You can find a sample website for our franchise partner here:
https://dev.biomoto-internatinal.com (English)
https://ch.biomoto-international.com (German)
We will provide this sample website as a starting point to you.
Of course you can do special adjustments to fit the needs of your customers but we kindly ask you to do this always in consultations with us. This is because of brand awareness and some technical issues.
As we want to build up a global directory of all shops worldwide it is important that every new shop is created according to our specifications. You will find the manual for adding shops in a post below.
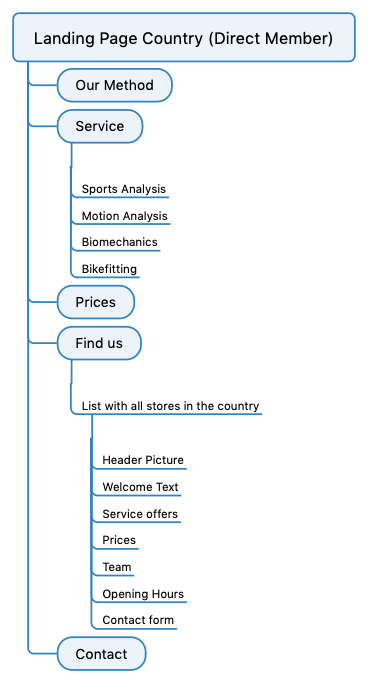
Website structure for each country
Basics
What is biomoto-international.com based on? How to login to the Content Management System (CMS)?
Basics
The whole website network of BIOMOTO is configured as a WordPress Multisite / Network installation.
WordPress is one of the most common Content Management System (CMS) in the world.
To add more functionality and get more convenience there are several plugins installed. Most important ones are:
-
A Front-End builder. This ist the centerpiece of the website.
Please find some tutorials for Beaver Builder here. - Beaver Themer
A Theme Builder and add-on for Beaver Builder to populate dynamic elements, layout templates and create individual header and footer. You won't get in touch with this most likely. - Ultimate Addons for Beaver Builder
Add-on for Beaver Builder to have more modules to build the website. - Advanced Custom Fields
Add custom fields at every post type to individualize every part of the website. In case of BIOMOTO this Plug In is important for creating the main color scheme and registration of new stores in a country. - HappyForms
A form plugin with a drag-and-drop form builder.
Theme
The whole network is using the Beaver Builder (Child) Theme. Individual pages can be structured and designed with the Beaver Builder. It's also possible to create more Child Theme variants for other continents/countries if needed.
Administrator
The whole network is administrated by Ideenplantage. If you have any questions or problems feel free to contact info@ideenplantage.de.
You will also get your credentials by Ideenplantage.
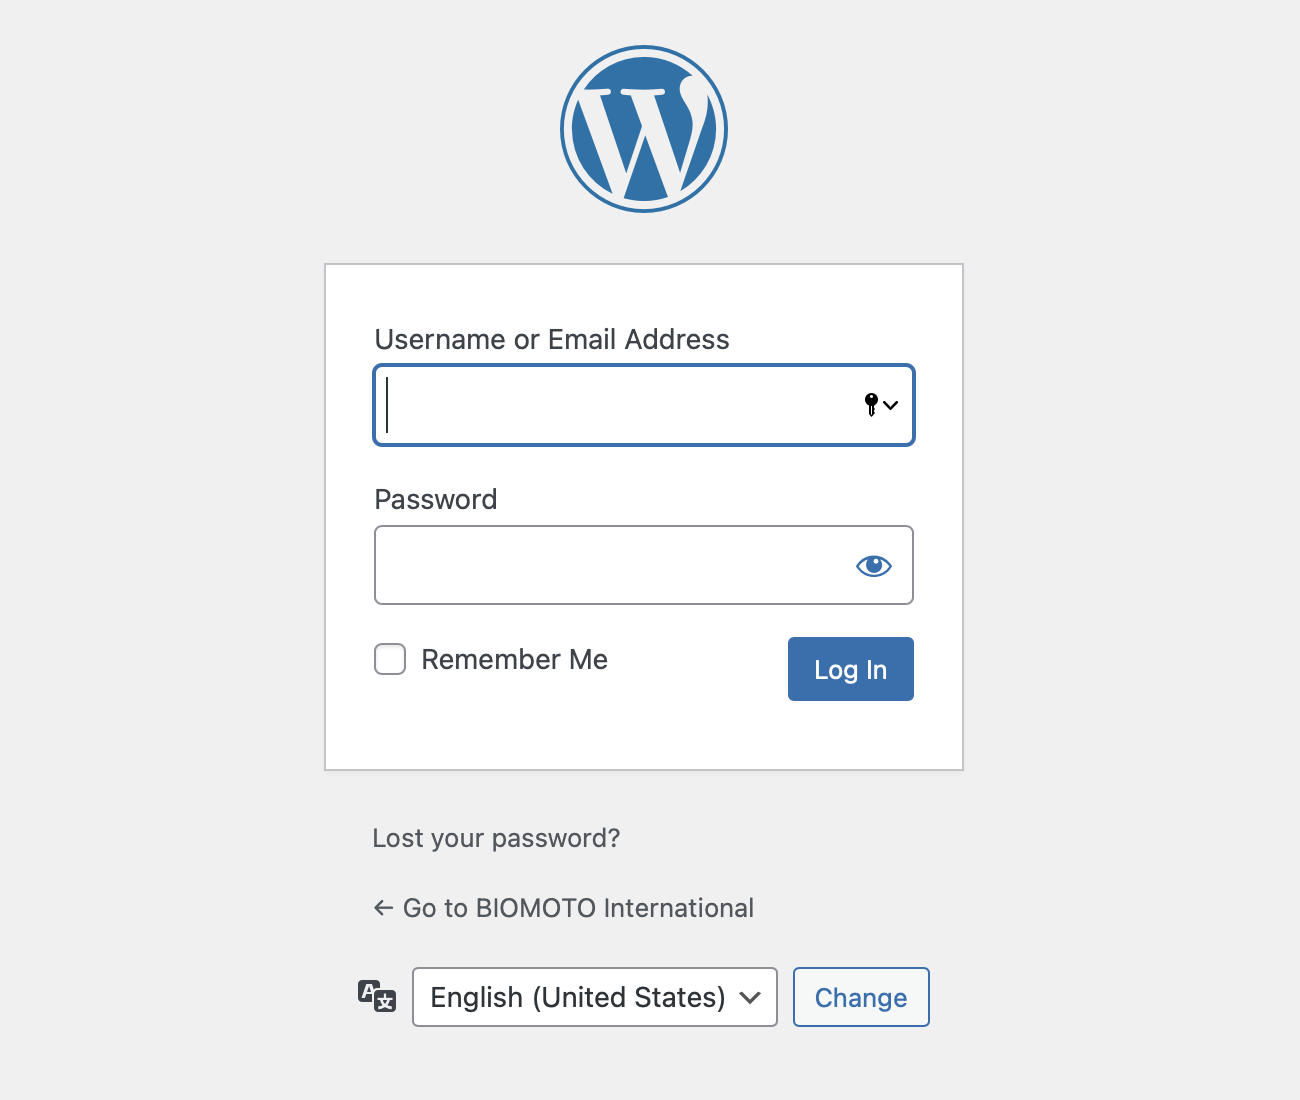
Login to Backend
To login to the background please visit https://biomoto-international.com/wp-admin and enter your credentials.
Your credentials will be sent to you by Ideenplantage. You can use your Username or Email Address.
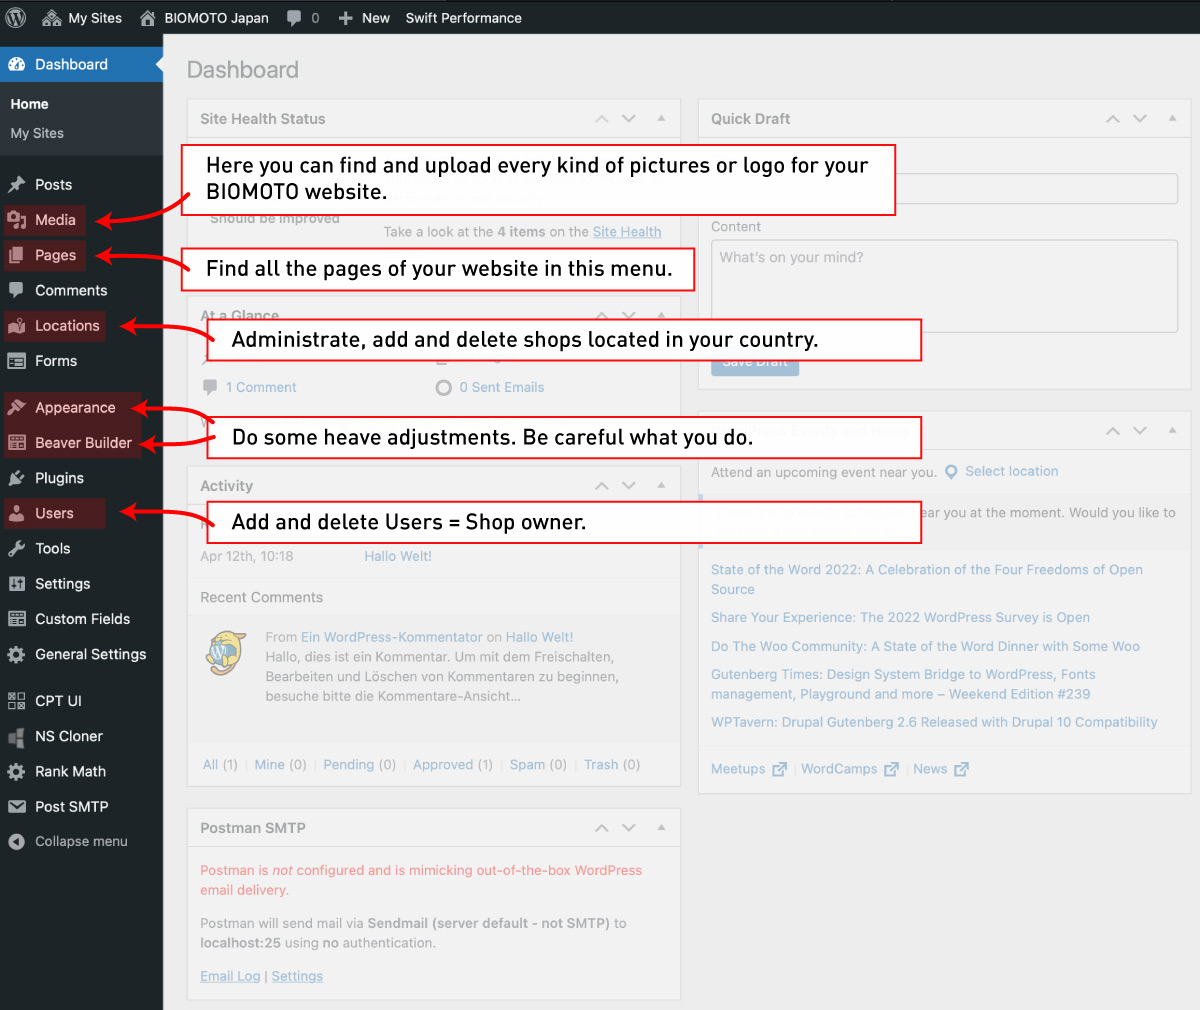
After you successfully logged in you should see the WordPress Dashboard:
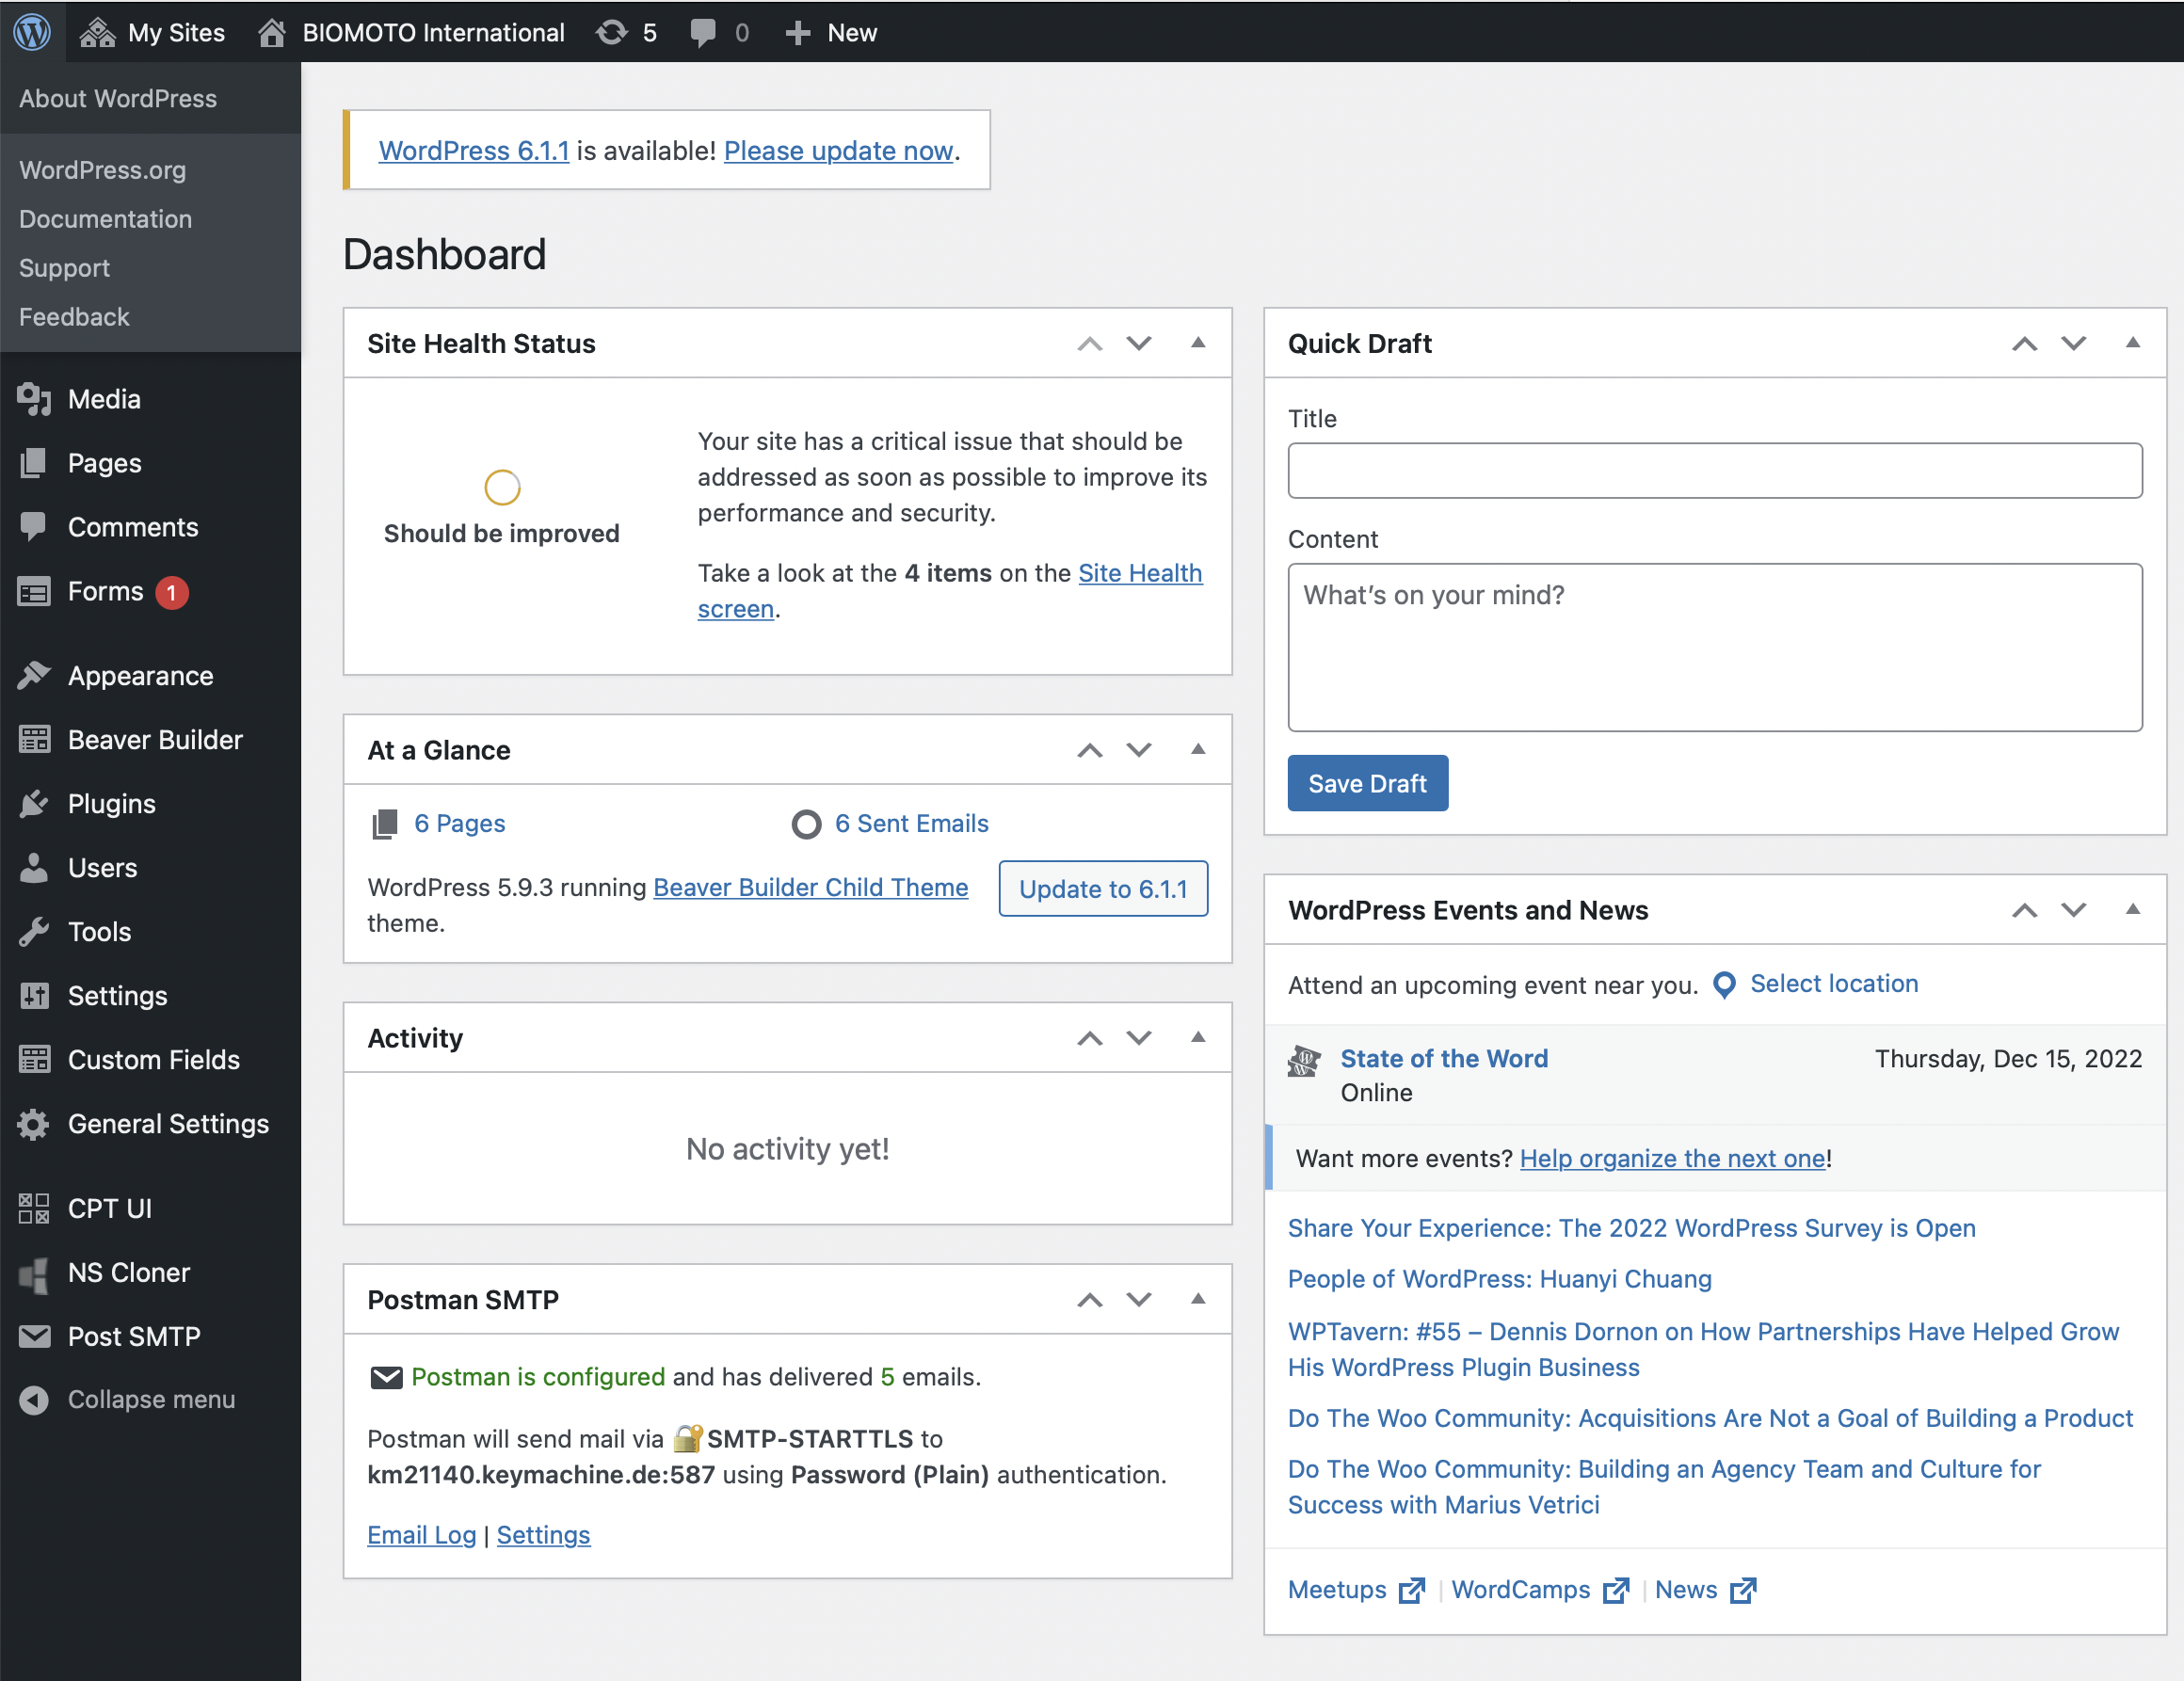
Importent Menu Items
Have a look at the highlighted menu items. These are the ones that can be important to you.
Adding a new Country
Step by Step Guide to add a new Country
Legal regulations
Each country has its' own laws to run a website. It is important for us to know if there are special legal requirements in your country to run your BIOMOTO website. Please make sure to inform us so we can take action to comply with your laws.
Please find examples for some countries below.
Germany
- Imprint with special informations based on the services you provide
- Privacy Policy with individual informations based on the services you use on the website
- Cookie acceptance to save cookies on visitors computer
- and some more
Adding a new Country
This is a step by step guide how to add a new country. Some tasks have to be done by the Administrator of the Multisite Network. Some others by the direct member / you.
| # | Task | Who |
| 1 |
Register Country Domain and map to BIOMOTO WordPress Multisite In some countries we need additional informations to register a top level domain. We will come back to you and ask for these information if needed. |
Administrator |
| 2 |
Create a "NoReply" E-Mail Inbox A No Reply E-Mail Inbox is necessary to send E-Mails via SMTP. This helps to not get into the spam folder of the recipient. |
Administrator |
| 3 |
Create a Subdomain for the country Using a 2 or 3 character subdomain ensures to have a place to develop the website and afterwards set it online by mapping the Top Level Domain to this instance. |
Administrator |
| 4 |
Clone the English or German development Site Our development sites are a good starting point for the countrys' website. That will safe you time and money. You will find the demo sites at: |
Administrator |
| 5 |
Create an admin user You will be able to login with your admin user credentials under https://biomoto-international.com/wp-admin. With this access you gain control over the complete country website. |
Administrator |
| 6 |
Activating several plugins Since we use many premium plugins we have to check these and activate them one by one. |
Administrator |
| 7 |
Empty Cashes Swift Performance and Beaver Builder Cache needs to be emptied after doing big changes. |
Administrator |
| 8 |
Workshop Giving a workshop to show the functions of the website. If this is not possible, please refer to this manual and kindly ask us for help if needed. |
Administrator / Member |
| 9 |
Translate names of pages and the page URL First go to the "Pages" menu and start to translate and change the name of each page. You have to rename the last part of the URL, too. Find the URL at the "Page" tab on the right side. For the URL just exchange the last part, use a "-" instead of a space and just use characters a-z (lower case) and letters 1-9. |
Administrator / Member |
| 10 |
Translate the content When you are in "Pages" menu you can hover over each page name and you will find the link "Beaver Builder" directly below the page name. Press it to get into the editor and you will be able to translate and change the whole content. |
Administrator / Member |
| 11 |
Mapping the Top Level Domain to the Site When you finished translating everything we can put the website into live status. We just have to map the Top Level Domain (TLD) - like biomoto.de instead of de.biomoto-international.com - to the site. |
Administrator |
| 12 |
Update database entries To make sure that all changes take place, we have to update many database entries. It's a search and replace action. |
Administrator |
Adding a new shop
How to add a new shop
How to add a new shop
What has to be considered technically
Since we want to build up a big worldwide BIOMOTO directory it is important to create a new shop page only the way described below.
Step by step guide
1. Contact us for creating a mail address
The shop will need an e-mail address. We are going to set this up and it will be something like "city@biomoto.xy". We will send you the login data for the mailbox afterwards.
2. If necessary create a new user
If you as an administrator want to manage the shop page you can skip this step.
If the shop page shall be administrated by the shop owner and this is not you, you have to create a new user: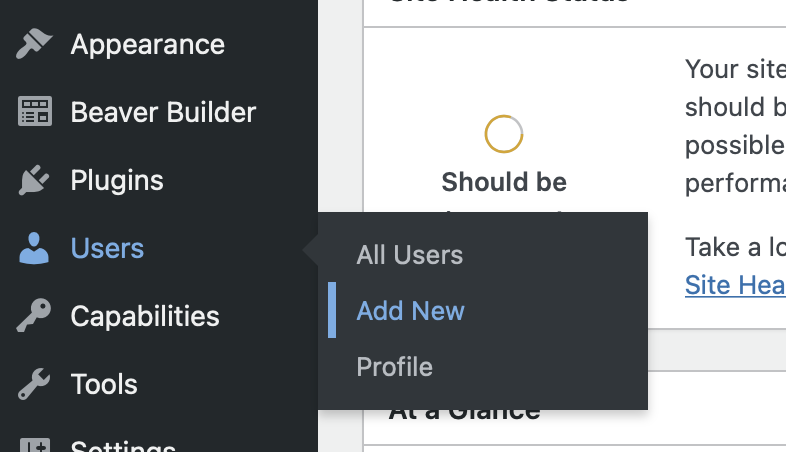
Get down to the "Add new User" paragraph and fill out the form.
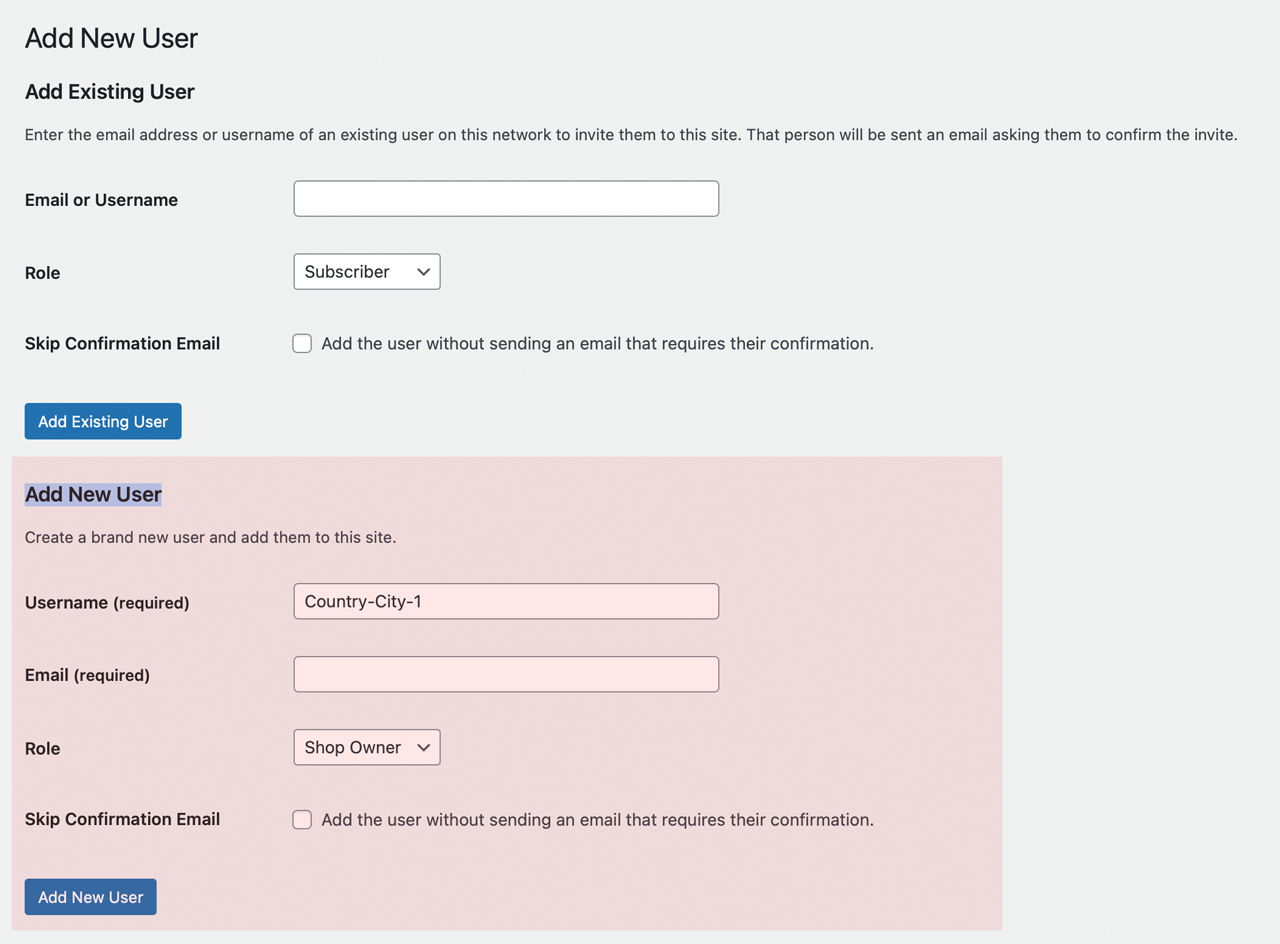
Please use this uniform schema: country-city-1
If there are more shops in one city just increase the number at the end.
Example: The second shop in Tokyo would get the username:
japan-tokyo-2
Our system will send an email to the specified email address. After clicking on the confirmation link in the mail you can set a password and the user is registered to the system.
If you don't want to send this mail please check the "Skip Confirmation Email" checkbox. You will have to set up the password manually by navigating to the "Users" -> "All Users" Menu, editing the new user and giving a new password by clicking on the "Set New Password" Button at the end of the page.
3. Create a new page with the name of the city where the shop is located
With our demo site there already comes a sample shop page called "Sample City". You can either edit this to your needs, just duplicate this page to use it as a template or create a whole new page.
You can hover over the "Sample City" entry and click "Edit" to directly edit the page. To duplicate the page please hover your mouse over the "Sample City" name and click on "Duplicate Page". There will be a new page where you can hover your mouse over it again and press "Edit". You will see a new menu similar to this:
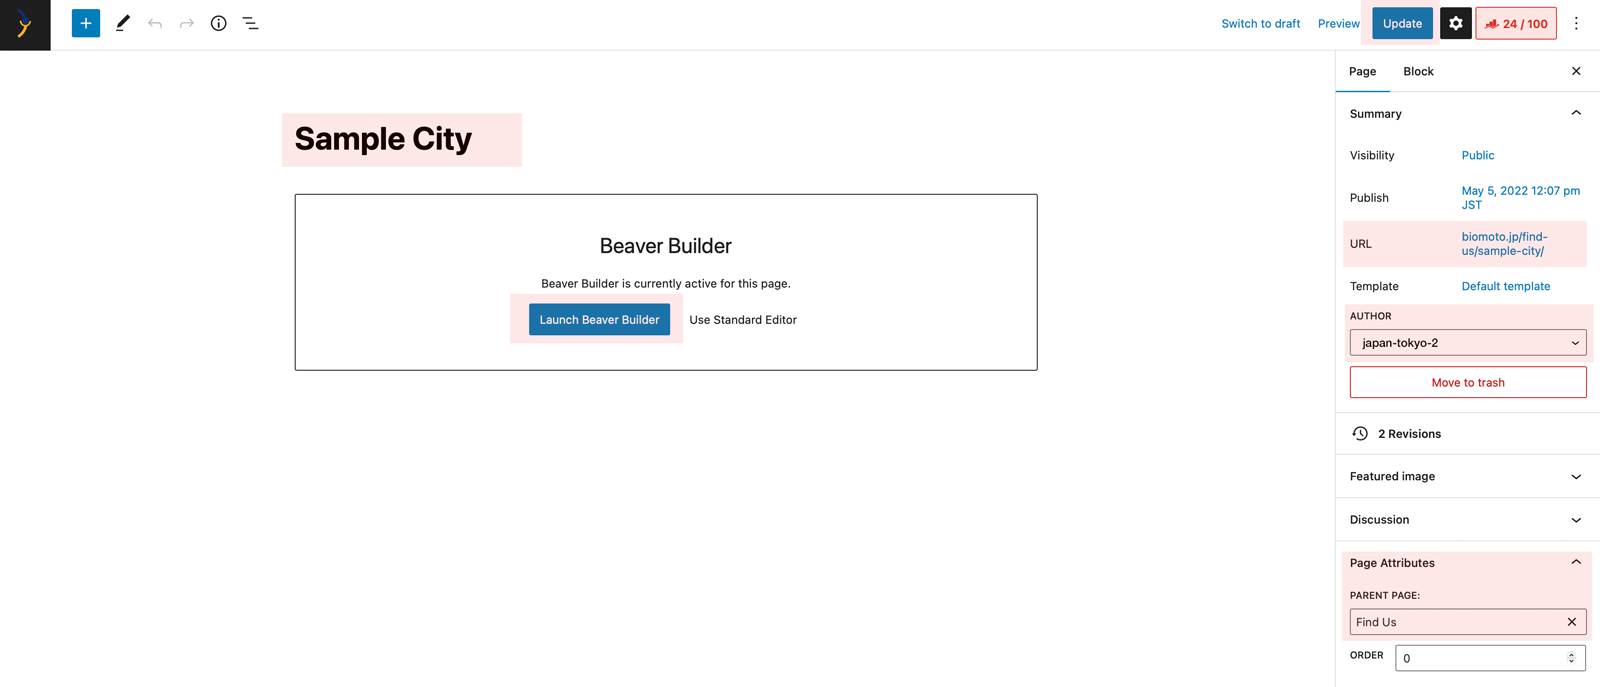
First edit the city name. If there are than one shops in one city please contact us since we have got different options to solve this.
As second make sure the URL changed to the city name, too.
Third edit the author. If you as an admin want to manage the page please set the author to your username. If it is the shop owner please change the author to the user created in step 2.
Last check if the parent page is set to "Find us" - or the corresponding translation in your language.
When everything is good please hit the "Update" Button. Afterwards you can open the Page Editor by clicking on the blue "Launch Beaver Builder".